Rethinking the Adobe Photo Editing Workflow is targeted at photo retouchers who work on large batches of images needing to produce a volume of edits on tight deadlines, with an eye to producing the most flexible final assets, suitable for digital & print usages.
Do you edit large batches of images? Maybe you manage a photo asset library, digitech photo shoots or shoot & edit your own photography? I’ve done all of the above and followed various photo editing workflows over the years. This year I’ve been doing more and larger photo editing projects. In light of the proliferation of specialized output (think Retina resolution, Wide Gamut Color, CMYK vs. RGB and the like) I’ve been rethinking my workflow. New features in Photoshop are enabling my new workflow ideas.
Why Change Anything?
If it ain’t broke, don’t fix it.
unknown
What’s broken in the photo editing workflow? On one hand, nothing is broken, just like nothing was broken in the film & paper days. On the other hand, there are potential efficiency and quality improvements. Finally, images require so many more treatments, it’s more complex than just making a CMYK and an RGB master–We now have Wide Gamut, Retina Resolution, Social Media-optimized crops, Digital printing, etc.
Improvements in Adobe Camera Raw (ACR) and Photoshop permit more edits to be directly applied to camera RAW files. Quality improves by linking every usage of an image to its original RAW image. The shorter the line between the original RAW to the Output file, the better potential for quality.
Photoshop is capable of linking to external images. Anyone who uses Indesign or Illustrator knows the potential in linked images.
Traditional Editing Workflow
Photoshop has traditionally created self-contained files. PSD files did not contain reference links to other image files. Consequently, file management consisted of a collection of RAW images that were processed into a collection of TIFF or PSD images which are eventually delivered to designers to place and/or edit. There is no integral links to the parent file. In more organized workflows, file naming conventions are used to indicate file geneology. For example:
RAW Image: Client_PhotoshootName_Subject_10001.DNG
Processed Image: Client_PhotoshootName_Subject_10001.PSD
Composed Image: Client_PhotoshootName_Subject_10001_10003_10004_COMP.PSD
Designer Edited Image: NamingConventionsRDumb_ALT2.PSD
Deliverable with Client-Mandated Naming: Spring2017_Dresses_Jane_Seafoam.PSD
Once the conversion from RAW occurs, there is no link to the original RAW file. One image composed with others requires a Layer note to indicate the original file the pixels come from, but if the original is modified, there is no notification in the composition document. Without some indication, there is no record of what images are used in your composition. This is a problem if someone asks you (or even better, someone else) to refer back to one of the source images for subsequent edits. Once someone else gets their hands on your files he may blow away the naming convention because the filenames are clumsy. Finally, the client may mandate a naming convention that their internal team requires.
This is a worst case scenario, most projects won’t include every stage illustrated above. Still, once you go down the Naming Convention Path, forever will it dominate your destiny.
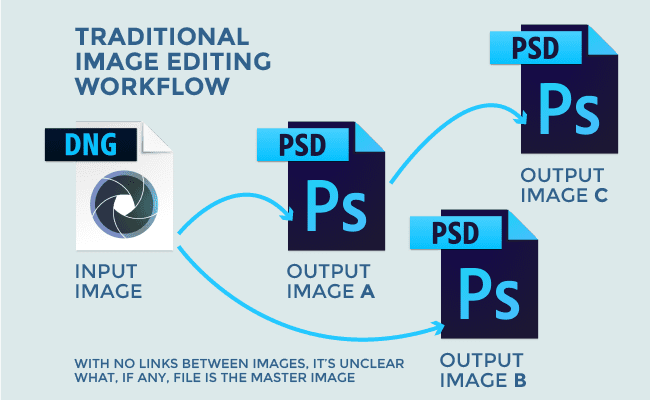
Summing up: You end up with siloed folders of images with no link connections. As the images progress from stage to stage it is reasonably easy to batch edit parent files, however, the edits will not automatically trickle down to child images. See illustration below that shows how the lack of clear parent/child relationships can cause problems:

Image C would not automatically pickup an edit made to Image A even though this diagram indicates it is clearly a derivative file. Image B is completely off to the side thought it might actually be a better starting point to build Image C from, but again, there is no link making the parent/child relationship clear.
Linked Image Editing Workflow
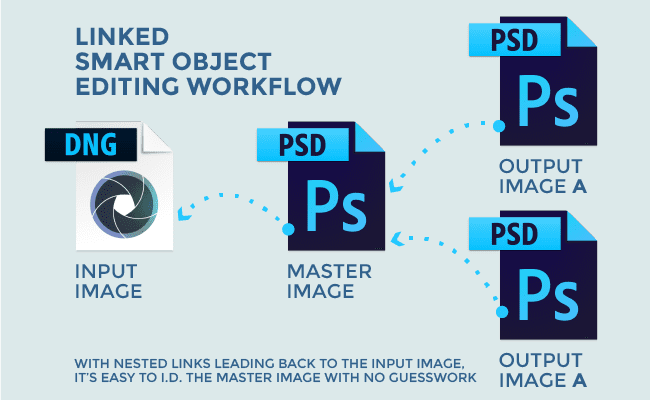
Here is the new workflow I have been using for the last few projects. I’m going to stay high-level in this list, I’ll get to click-by-click instructions and deeper discussion of related ideas later on. See Part 2 for the in-depth, click-by-click discussion. Just like the Traditional Workflow, each item in this list represents a separate file.
- Input Image (I use RAW images whenever I can get them, and I’ll assume you are also using RAW images going forward). I apply Overall Tonal/Color edits, Local Tonal/Color edits, Clone/Heal spots, Lens Correction, etc.
- Master Image is a PSD linked to the Input Image(s). Do detailed spotting, cloning, reconstruction, image composition and frequency separation edits in this file. The goal with this file is to be the highest resolution, widest color gamut Master Image upon which to build Output Images. Place this image in creative concept layouts. Edits made to the Input Image will be automatically picked up when this file is opened.
- Output Image is a PSD linked to the Master Image. You might have more than one Output Image per Master Image. These will be your final image assets placed into final keyline layouts or uploaded to production servers for web usage. Set your color space to the required output space (for example: sRGB for conventional web images, GRACoL for sheetfed lithographic printing). If resizing and/or cropping is necessary, this file is generally the place to apply those transformations. Edits made to the Master Image will be automatically picked up when this file is opened.

Each image here is clearly linked to a parent image. Edits made to the immediate parent will trigger an update the next time a child is opened. Note that changes cascade down one generation at a time—Editing the Input Image would not directly prompt an update to Output Images. For an edit to the Input Image to get all the way to Output Images, the edits must first be saved to the Input Image, then open-update-save the Master Image, after which all the child Output Images will pickup the edits upon opening. Double-clicking the Linked Smart Object in a child image will automatically open the correct parent image.
Here is an example of how naming can be treated more flexibly through the iterative edit process, notice they are more human-readable because the serial number and potoshoot name are inherited via link to the original RAW Input Image:
Input Image: Client_PhotoshootName_Subject_10001.DNG
Master Image: Spring2017_Dresses_Seafoam.PSD
Output Images: Spring2017_Dresses_Seafoam_1280px.PSD, Spring2017_Dresses_Seafoam_CMYK.PSD
Designer Edited Image: Spring2017_Dresses_Seafoam_ALT2.PSD
Deliverable with Client-Mandated Naming: Spring2017_Dresses_Jane_Seafoam.PSD
Advantages
Being able to Double Click a layer in your PSD to get to the parent file is an amazing convenience. You will find yourself keeping your images in better sync since its easier to flow edits downstream. Rethinking the Adobe photo editing workflow Allows for batch editing of camera RAW files after they have been processed is pretty much science fiction compared to the limitation of the traditional Embedded Smart Object ways.
See Part 2 of this post for more technical details.
Talk nerdy to me 😉
