In Part 1 of this Photo Editing Workflow series I compared a traditional editing workflow with a new system I have been using in my last few projects. I pointed out some gotcha’s inherent in the traditional methods and potential improvements gained by rethinking the Adobe photo editing workflow. In this post I take a deeper dive into the nuts and bolts of how the new tools work. There are some workarounds suggested for areas the software is still catching up with my workflow.
I’m going to discuss RAW conversion at length. If you don’t do RAW conversion in your workflow, please substitute your starting input file of choice where I refer to RAW files. For example, if you receive TIFF images from your photographer go ahead and use those TIFFs where I mention RAW and adapt the instructions below accordingly.
You’ve probably heard of and used Photoshop’s Smart Object feature since it’s introduction in 2005’s Photoshop CS2. My earliest use of Smart Objects was embedding camera RAW files (with settings intact, and editable) into my PSD files. This allowed me double-click access to the original RAW image when I needed to quickly edit the RAW conversion settings. The system was a great improvement over chasing down an original RAW file to make edits and reconvert into a PSD image. Where the Embedded Smart Object falls down is its limitation of editing one RAW at a time. You cannot batch process 50 RAWs that are Embedded Smart Objects at once and apply a common White Balance adjustment, for example. This is one of the great powers of Adobe Camera Raw (ACR)—batch processing to quickly match looks across collections of images—it’s a shame to give that up in exchange for the ability to embed the editable RAW into a PSD file. My workflow for batch image processing was to edit RAWs in batches using ACR until I was happy with how everything looked then Open as Object which embeds each RAW into own PSD file. Hopefully I didn’t need to make big batch edits to the RAW settings after embedding them into Smart Objects. If I did, I was back to square one. What if there was a better way?
Enter Linked Smart Objects.
As of Photoshop CC (2014.2) its possible to convert an Embedded Smart Object to a Linked Smart Object which works much the same as Linked Artwork in Illustrator or InDesign. Unfortunately, Adobe hasn’t made it easy to jump straight from RAW to PSD with Embedded Link to original RAW. Photoshop automation using an Action is your friend to workaround the lack of a direct path provided by Adobe. Steps below:
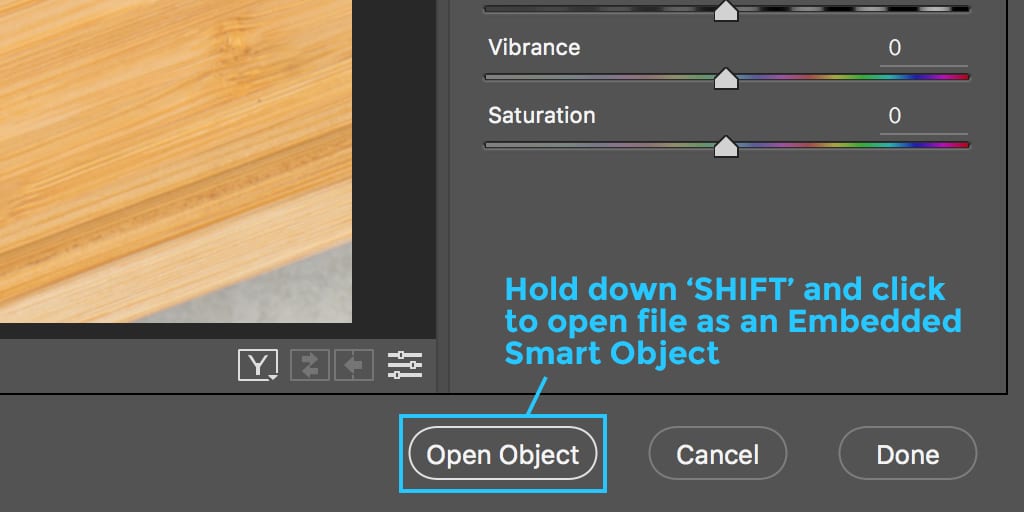
- Open your full batch of RAW files in ACR, select them all, and Shift-Click “Open as Object” which opens each RAW image in their own Photoshop window as Embedded Smart Objects. Note: these images are not yet saved to disk yet.

- Change the Embedded Smart Object containing your RAW file to a Linked Smart Object (see screenshot).
 You will be prompted to pick a location to save the linked RAW file. This is weird. You will end up with two copies of the same RAW image: The one you originally opened and this new one you just saved. I have not figured out a way to create a PSD containing a Linked Smart Object pointing to an existing RAW image on disk in one step. If anyone from Adobe reads this, I’d be most interested in a way to directly open a batch of RAWs from ACR into PSDs containing Linked Smart Objects. I’ve got a keyboard modifier in mind for the Open button in ACR to trigger this behavior: Shift-Option-Click “Open Linked Object(s)” which is a variation on the existing Shift-Click “Open Object(s)” that is already built-in to ACR (shown in screenshot above) and opens all selected RAWs as Embedded Smart Objects. If you are reading this, it means I have not been contacted by Adobe about how to streamline this process.
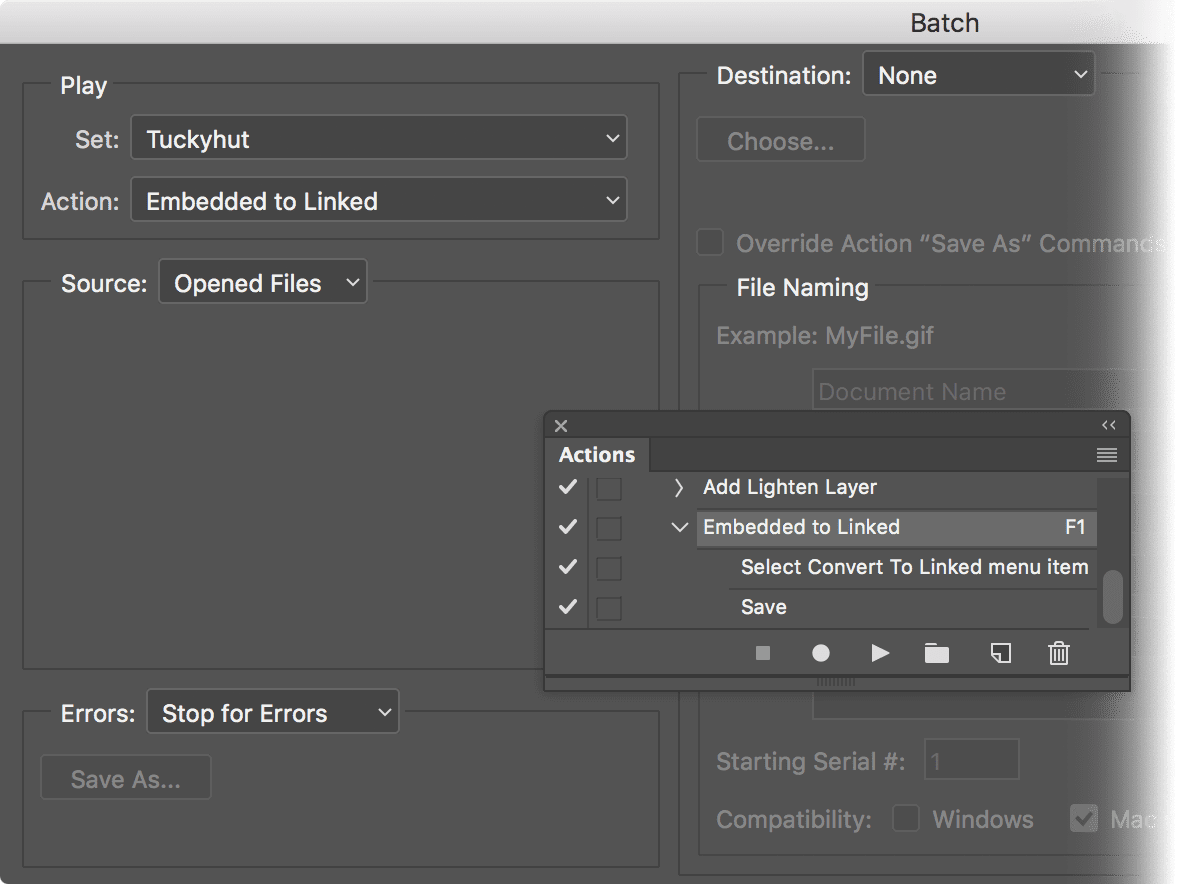
In the meantime, I suggest you use a Photoshop Action to convert the Embedded Smart Objects to Linked Smart Objects. Here is how I made and run my Action, though script experts may have better techniques, I’d love to see comments with ideas for improvement:- Create an Action that does these functions in this order: One – Select Menu Item: Convert to Linked, Two – Select Menu Item: Save
- Make sure you have completed Step A of this list. Run the Action you just made using Photoshop’s Automate > Batch command.

- You will need to pick a location to save both the new Linked Smart Objects and PSD images. My suggestion is to make a new folder and but both the Linked Smart Object and PSD files in the same folder, if you do that, you can just hit ‘RETURN’ at each Save dialog box without navigating or individually naming files. Just hit ‘RETURN’ as fast as you can and you’ll be done soon enough.
- Clean up your mess. Filenames: Your PSD files probably have some extra characters, like ’–1’ appended to the end of the filename. ACR seems to automatically add this to files opened as Smart Objects. You could have edited this out rather than hit RETURN as fast as possible above, but there is an easier way. Adobe Bridge has a great little Batch Renaming function located in Bridge under Tools > Batch Rename… which makes quick work of batch editing filenames. While you are at it, use this tool in other parts of your workflow that require filename manipulation. Extra RAW files: As mentioned above, you now have two copies of your RAW files, I recommend you delete the original set, since the new PSDs are looking to the new location you saved the RAW to in the steps above.
Now you have a Master set of PSD images that are linked to editable RAW files. You can still batch edit your RAW settings in ACR and update your PSD master image automatically by simply opening it, allowing the Link to update, then saving the changes upon closing.
Linked Image Editing Deep Dive
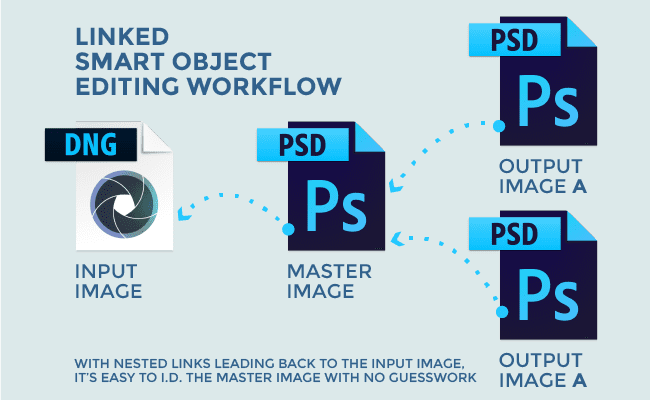
Here is the deeper discussion of Linked Image Workflow promised in Part 1. Remember that edits made further up the list will trickle down. Don’t make edits to a Master Image you wouldn’t want to trickle down to all the Output Images linked to it.
- Input Image Files should be camera RAW (if you have them) or processed TIFF or PSD from a photographer. The edits should be high-level. I will use ACR tools to apply: Lens Correction, Spotting & light Cloning, White Balance, Overall Tonal & Color Edits, Local Tonal & Color Edits and other editing that is feasible to perform within ACR. The big picture stuff. Make sure the Color Mode (shown at the bottom of the window) is appropriate for all potential usages. Once the Color Mode is locked in at this stage, you are loping off any colors that don’t fit into that model. I use AdobeRGB (1998) because it fully encompasses the sRGB color space used for the web and is reasonably close to the gamut of the better quality CMYK output profiles. If you are producing high-end on-screen images, you may consider Pro Photo RGB or one of the DCI Wide Gamut profiles. If you really want to go gonzo high-end, consider setting 16-bit-per-channel here and in your Master Image, understand that 16 bit mode is significantly slower to edit and occupies significantly more disk space. If you are strictly doing basic web imagery, you might get away with using sRGB and minimize potential color shifts downstream.
Do not Crop or Resample this image. You might consider using ACR’s perspective correction tools at this stage, though you may consider applying this in the next step. Remember that there will be a live link back to this image in the subsequent images, which is why perspective manipulation may be questionable since subsequent perspective edits might cause misalignment down the line. Lens Correction should be applied before creating the linked Master Image detailed below since it is an overall geometric manipulation that may cause the same misalignment problems down the line. - Master Image is a PSD linked to the Input Image(s). I would do any image composition using other Input Images in the Master Image file. The goal with this file is to keep color gamut and editability at maximum. The Working Color Space should match the one you picked for the Input Image discussed above. Do detailed spotting, cloning and reconstruction in this file. All image compositions and special effects should be built in this file. Generally, do not resample this file, any scaling or cropping should be done to the children of this file. Don’t Flatten Layers or Rasterize Objects. Edits made to the Input Image will be automatically picked up when this file is opened.
- Output Image is a PSD linked to the Master Image. You might have more than one Output Image per Master Image. Add any application-specific edits to this file, for example: Adding extra bleed area to accommodate a special cropping, locally darken background to increase contrast with type, editing to address shortcomings of the printing process. Try to limit the type of edits done in this file, if the edit should be used for ALL instances of this image, it should be made in the Master Image so it trickles down to ALL Output images due to the linked Smart Object behavior. These Output Images will be your final image assets placed into layouts. Set your color space to the required output space (for example: sRGB for conventional web images, GRACoL for sheetfed lithographic printing). If resizing and/or cropping is necessary, this file is generally the place to apply those transformations. Edits made to the Master Image will be automatically picked up when this file is opened.

Conclusion
Reading through this, there are lots of steps and considerations. Don’t let that scare you off! I find it easier to confidently repurpose my Master Images when I use Linked Smart Objects, being sure I have the latest edits to a Master Image. It took a little while to get used to this system, but now that I use it every time, I am finding it easier to work with photos.
It brings the best parts of Linked graphics I’ve used for years in InDesign & Illustrator to Photoshop. That’s enough for me on its own.
How can best practices be applied to your photography workflow?
