A couple months ago I received a question from a reader in response to a comment I left on a LinkedIn post:
I saw your comment regarding Adobe Illustrator design for conical cups. We use the same warp method you describe, but I have concerns about elements at the top of my design being more distorted than elements at the bottom. Particularly, I have a horizontally oriented logo that stretches a bit too much. I varied from your post in that I didn’t average the widths. Instead, I made a rectangle close to the width of the lower circumference and applied warp until the rectangle was nearly perfect to fit the die. I then designed within that rectangle and applied the warp.
LinkedIn Commentor
This question was the genesis of this multi-part tutorial on Curving artwork to fit to cups or fitting a curved supplied dieline. I’ll address the reader’s particular question as well as raise and address several others.
Potential Complications
These will be addressed later, but below is a short list of things that could complicate the process. I won’t give much detail, just know you will need to keep your eyes open for the parts of this tutorial series that give you the detail needed to manage these situations.
- Vector Art and Raster Art used in the same design
- Artwork that Bleeds
- Clipping masks that hide artwork that extends past the trim line
- You haven’t been provided a curved dieline
Curved Dielines
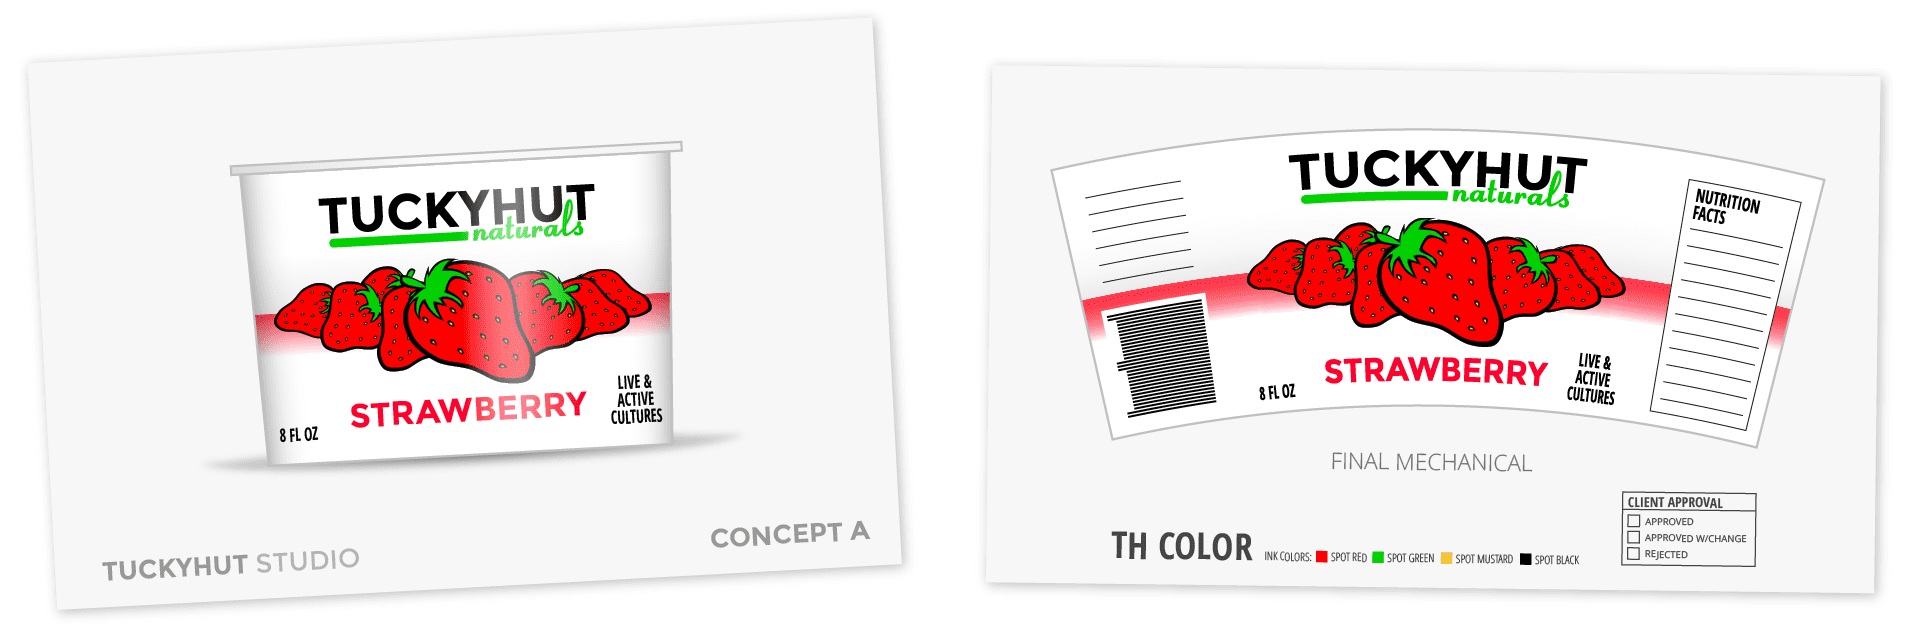
Do you ever need to warp artwork to fit a provided curved or arced dieline? Your design concept is likely built on a rectangular shape showing the Principle Display Panel. Perhaps you’ve roughly mocked up in 2D on a shelf set or other rendering. Perhaps something like the rendering below:

You know that the rectangular design concept doesn’t quite fit if you print and trim it out then try to wrap it around the package, but this rendering works great for the concept phase of your presentation. Eventually, however, the design needs to be prepared for print production or maybe just a physical mockup and the artwork will need to be warped to match a provided die line that looks something like this:

Let’s call this the Target Dieline. The goal of this tutorial is to warp your rectangular concept artwork to match this Target Dieline. We want to do this both efficiently and to a high degree of technical precision. As you might guess, I’m not going to suggest you massage the whole design by hand to match the Target Dieline! If you are building a production mechanical key line, it is doubly important to maintain the highest level of quality. Following these techniques will allow you to do just that.
If you have not been provided a Target Dieline, but you have a sample package to measure, fear not: Part 2 of this tutorial series is for you.
A (very) little Geometry
Take a moment to understand the geometry of the structure you are fitting the artwork to. Imagine how the typical curved dieline rolls up to fit the structure. How was this dieline shape arrived at? Any cylindrical package with a different diameter at top and bottom ends with straight walls joining these ends is a segment of an imaginary cone. See below:
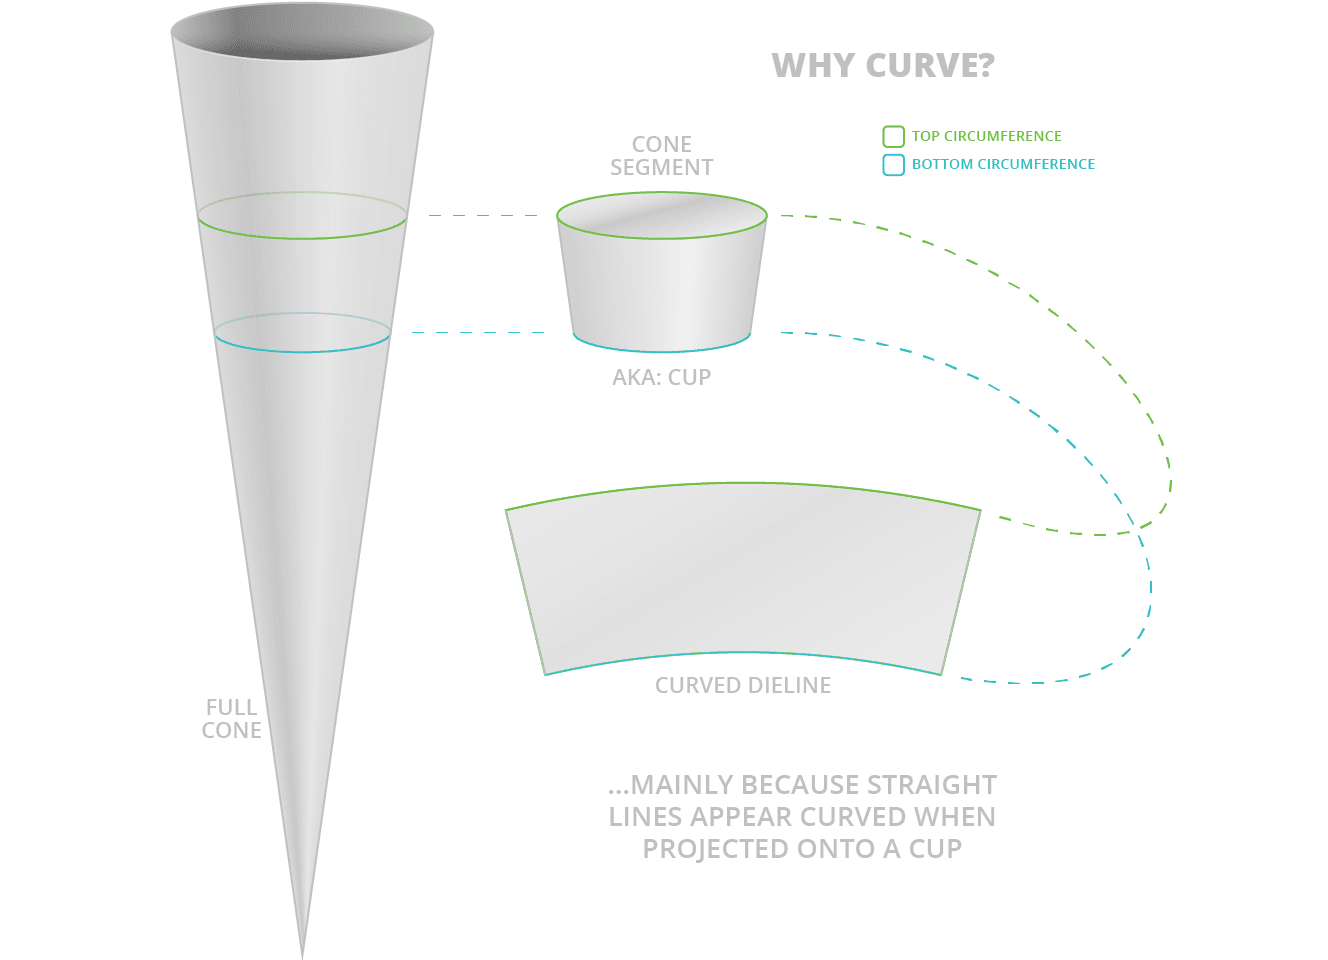
Differences in the proportion of the top & bottom circumference measurements interacting with the height measurement is why there is no one-size-fits-all solution to the curve problem.
Analyze curved dieline & determine Ideal Rectangular Shape
Your design was built on a rectangular shape. Where did that rectangular shape come from? Rough guesstimate? Not sure? There is an Ideal Rectangular Shape for every curved dieline. Let’s determine that ideal shape and reformat your concept artwork to fit.
Prepare the curved Target Dieline for measurement:
Bleeds: If you need a bleed, you should add it to the curved dieline before measuring. Measure the dieline plus bleed (the same amount of bleed you are building into your rectangular concept artwork). Know that you will drop the Target Dieline onto your finished curved artwork to restore the original trim line.
Dielines with radiused corners: You need to measure to the sharp corner that would exist without the radius. If you are using Adobe Illustrator CC it can be quite simple to remove radius using the Live Corners tool. Not all curves are editable with Live Corners, unfortunately. If the curve isn’t editable by the Live Corner tool, just rebuild sharp corners as best you can. Like bleed (as mentioned above) the radiused corners will be added back at the end of the curving process. See diagram below to see a before and after radiused corner removal:

Measure the curved Target Dieline:
- Height is easy. Measure the height at the horizontal center, at the highest point of both curves. See diagram below.
- Top Chord Straight line between top two corners of dieline. See diagram below.
- Bottom Chord Straight line between bottom two corners of dieline. See diagram below.

Calculate Ideal Rectangular Shape
Calculate the dimensions on which to build your rectangular artwork: Height x the average of top & bottom chords. This is your Ideal Rectangular Shape.
Apply design to the Ideal Rectangular Shape
Once you have built the artwork to fit this Ideal Rectangular Shape, save your work. Check once more that everything is right. Consider showing your client one last time. Editing your file gets complicated after this point. I suggest duplicating your file so you can come back to this point if needed.

NOTE: You must be using Illustrator to follow the technical instructions. Be sure your artwork is designed in Illustrator using no linked graphics (we will discuss how to handle linked graphics in Part 2 of this tutorial). Illustrator is the industry standard for Packaging work, so that should go without saying, but if it needs saying, well…it’s been said.
If you have your own reasons for not using Illustrator, you’ll have to find you own techniques to apply the concepts discussed below. I hope this translates conceptually so the ideas discussed can be applied to other workflows. If you do figure out another way, please comment on this post and share your ideas.
Preparing to apply Illustrator Warp Tool
Illustrator’s Warp function has (at least) three idiosyncrasies:
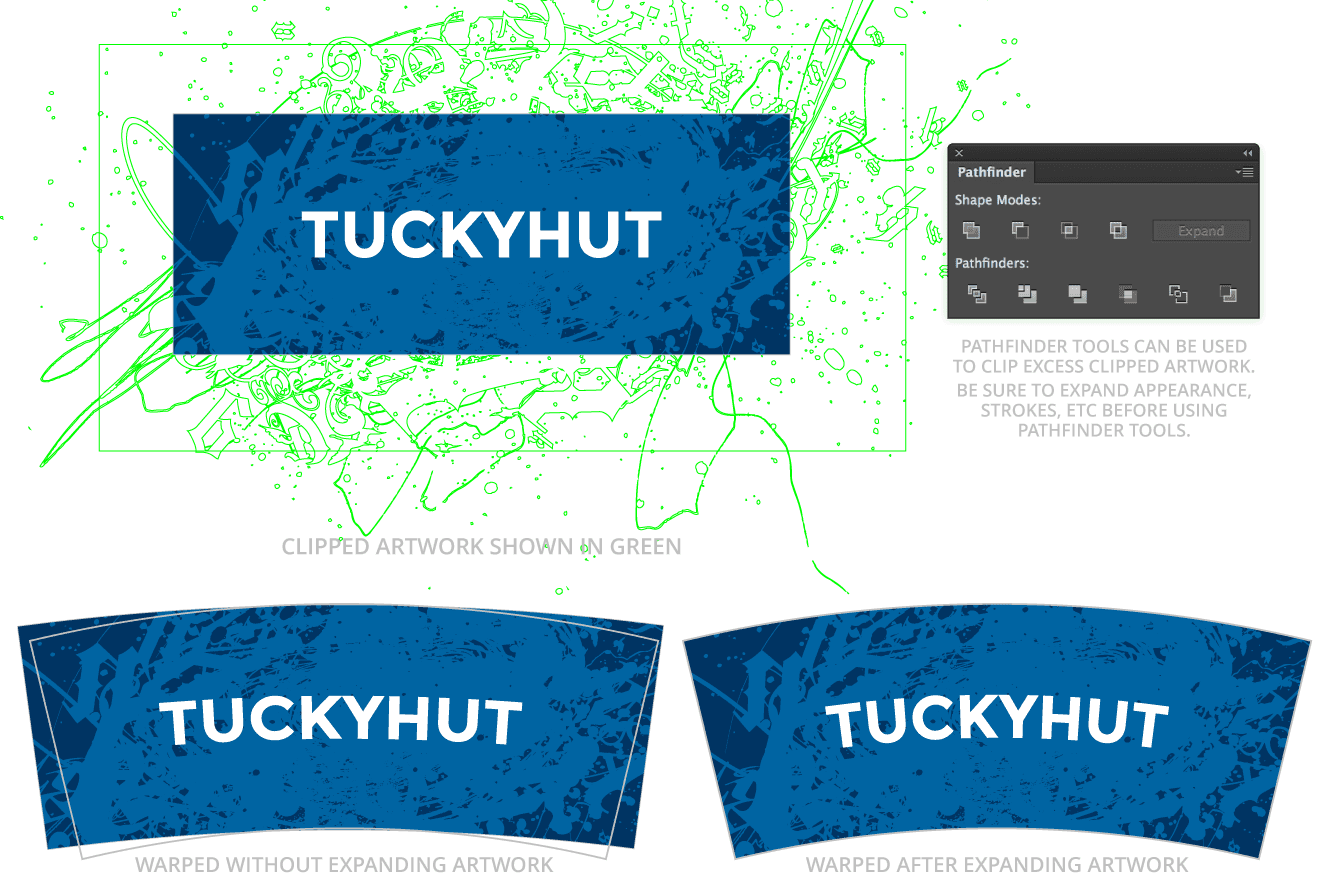
- Warp doesn’t disregard artwork hidden behind a clipping mask. In other words, the warp envelope will extend out to the edge of the artwork hidden behind a clipping mask, this will destroy all the hard work you’ve done (and your curve). This is exactly opposite of how the regular Transform tool works in Illustrator, so this behavior was most unexpected the first time I discovered it. I’d call it a bug in the software. You will need to actually trim away excess clipped artwork. Use Command-Y (Outline view) to see all vectors in a wireframe view, this will help you spot the artwork that is clipped and not visible in the normal Preview view mode. Use Command-Y again to return to normal Preview view mode. Expand Appearances and use Pathfinder to trim away masked artwork. I won’t go into detail, just a quick example below to make the point clearly:
- Warp will not warp linked images. Linking images (especially raster) is best practice, thus you need to manage linked images separately. Photoshop has a Warp feature as well, I will post a follow-up article showing my workflow. One tidbit that might get you started: The Photoshop Warp tool uses exactly the same settings as the Illustrator Warp tool. All that said, if you can live with Embedded images, Illustrator will happily Warp Embedded Raster images, although I suggest against this technique.
- Complex Appearance effects, Live Type, Blends, Path Profiles, etc. can get glitchy when placed inside a Warp. Check your art carefully, especially areas that use tricky techniques. Expand and Expand Appearance can be your friends here. Also, check out the Envelope Options menu item which gives a few toggles that may help render certain types of artwork better (see the image at the bottom of this article for a practical example of one of these settings). Expect to do some trial and error troubleshooting.
Final idiosyncrasy
There will be Horizontal distortion at the top and bottom of your artwork. On the smaller end (usually the bottom) artwork will be compressed. On the larger end artwork will be expanded horizontally. The diagram below is a representation of how this distortion is distributed across the curved artwork:

This distortion isn’t Illustrator-specific. It is inherent in the curving process no matter how the curve is applied. It can even be introduced on the printing press during the production run. Mitigating this distortion is the reason for step 2 in the Perform the Curve instruction below. Without step 2 (and without using the average of the two chord measurements to create your Ideal Rectangular Shape) the distortion would be distributed in one direction—no distortion at the bottom and extreme distortion as you move up the package. This is the problem described by the reader who inspired this tutorial series. Funny how it’s turned out to be a pretty small part of the process.
Perform the curve!
- Final preparation—make sure the artwork is unlocked, on one layer and grouped into a single group.
- Horizontally Scale the Ideal Rectangular Shape and all the artwork to match the width of the Bottom Chord measurement you took earlier. This is to compensate for a distortion that is introduced in the next step (see diagram below for details). This will make all artwork narrower while leaving the vertical dimension untouched. This is by design.
- Place this scaled artwork over the Target Dieline. The bottom corners of the artwork should sit right on the bottom corners of the Target Dieline. If the corners don’t line up, something is wrong.
- Apply Envelope Distort > Make with Warp… and in the dialog box that appears select Style > Arc and use the Bend property to adjust the curve until you match the Target Dieline. Confirm by clicking Okay. The last three steps are diagramed below:
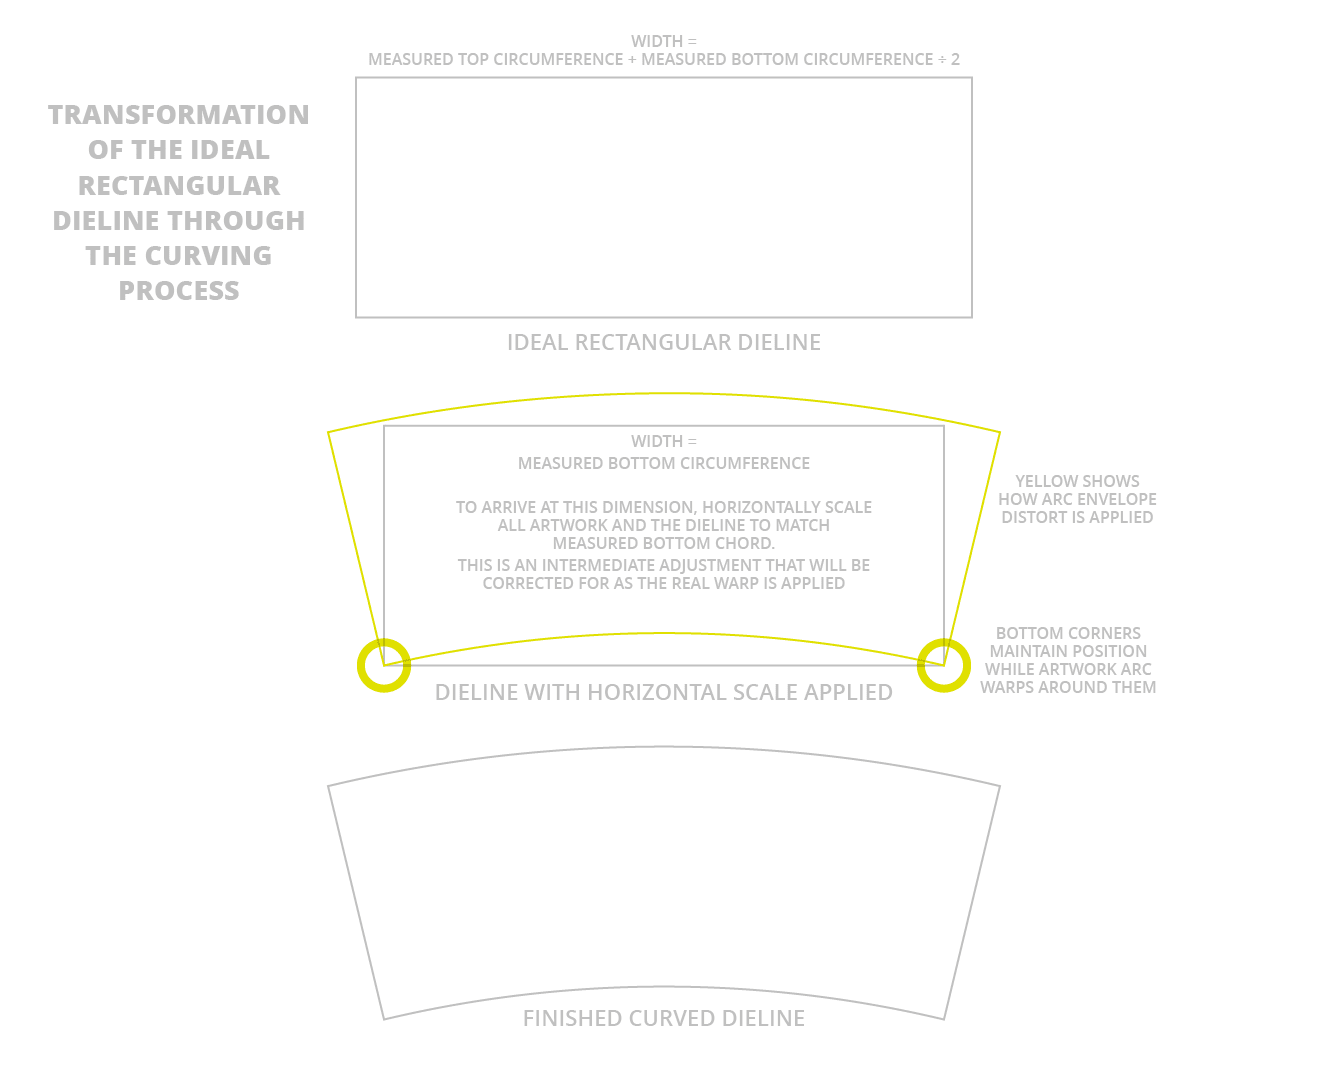
- Place the Target Dieline over your freshly curved artwork, this will put back any radiused corners and trim lines that may have ben ignored during the preparation for curving.
- Save this file. Again, I strongly suggest not overwriting your Ideal Rectangular Shape file. Depending on how much Expanding and Pathfindering was needed to get to this stage, this curved file will be much more difficult to edit.

Unless you have Raster graphics that need curving, you are done. Time to treat yourself to a beer or a nice walk around the neighborhood!
Next up is Part 2 of this series where I discuss how to build a curve when you don’t even have a Target Dieline.
Maybe you could use a freelance production partner to manage this process?
Worked like a charm! Thank you for posting this info.
First up – thanks so much for going to such lengths. Been really helpful.
Maybe it’s just me though, but the website link you posted to get the curve formula didn’t work out. I tried it a few different ways, double-checked my inputs and it just didn’t match up.
FYI, I found this link to make the template, which seems to have worked out perfect, and it gives an SVG downloadable file, which is really handy:
http://www.templatemaker.nl/cone
Now that I’ve got the template down, I’ll definitely be using your post to convert my rectangle design into the curved print version.
Thanks again.
You are my hero! I was procrastinating this task like crazy because I had no clue what I was doing. Now everything is super precise, just the way I like it. Thank you so much!
Like the others just wanted to say thanks for this post. I had no idea how to go about doing this and this has made it so easy. Huge thanks.
REALLY helpful post! Been reverse-engineering straight “ideal rectangular shapes” out of curved templates to use in my 3D mockups for years. I got most of it right but you really helped but always had to do some manual adjustments. Thanks for the extremely clear process you’ve outlined here!
Thank you very much! I have a new customer who wanted to make artworks for paper cups and I had no idea about it. You saved me from serious nervous breakdown!
Exactly what I was looking for. Thanks a bunch!
You’re welcome, Jessica. I’m so happy this post is still helping people! Even I refer to it when this kind of project lands on my desk.
Hello – this has *almost* worked like a charm for me… for some reason the height of the artwork shrinks when I Warp/Arc the graphics. eg the curve is perfect but and it reaches each side perfect, I just now don’t have the artwork reaching the top and bottom of the curved dieline. I have double checked the measurements and instructions. Where am I going wrong? Does this happen to anyone else?