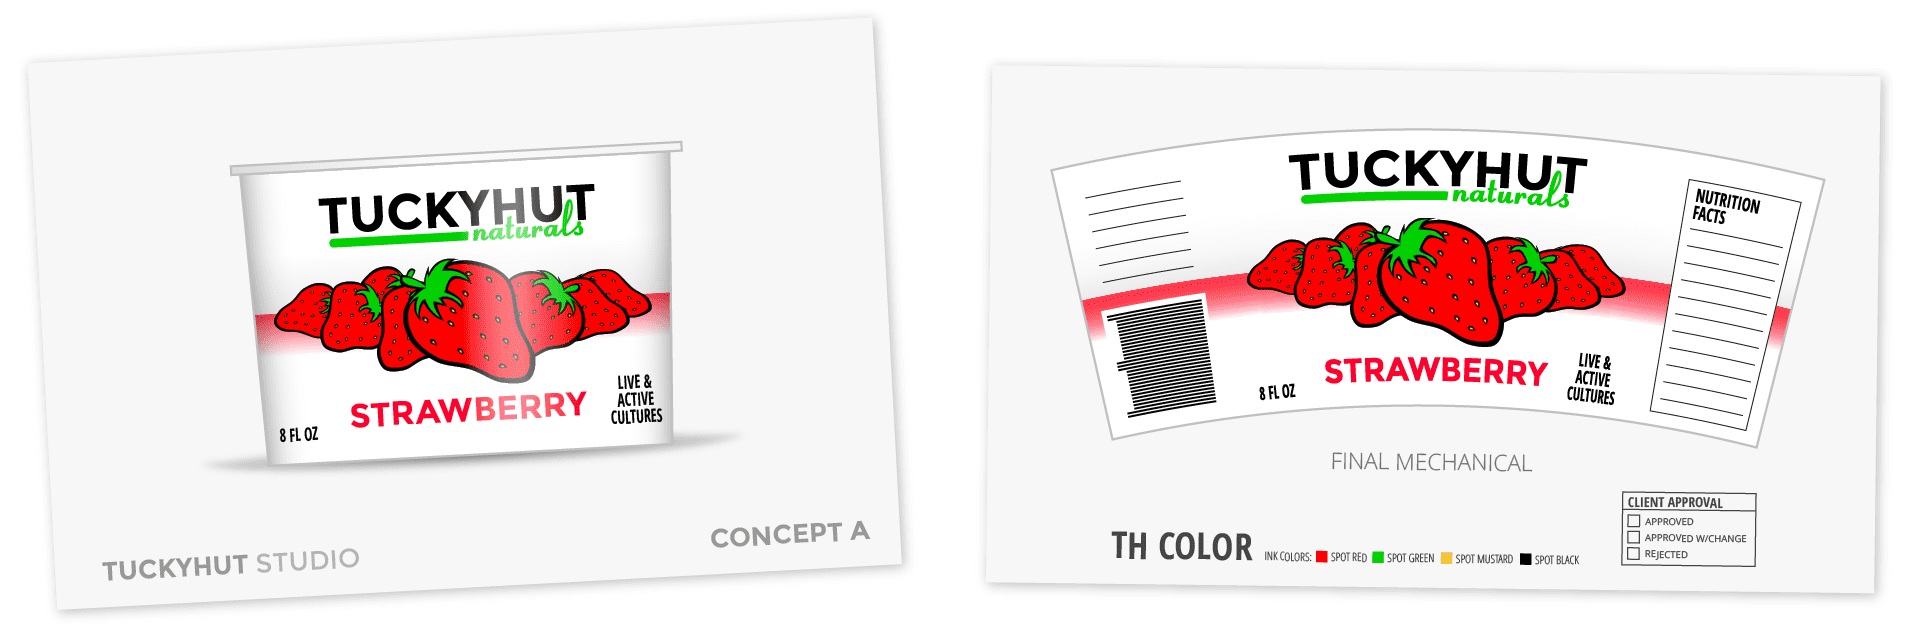
In part one of this tutorial series, I showed how to adapt your rectangular label artwork concepts to a curved printer dieline. Sometimes you aren’t provided a dieline, just a package sample. It’s quite possible to create curved artwork without a target dieline. You’ll need a physical sample of the package to measure. And make sure you have some string. I’ll explain later.
After measuring and doing a bit of math, you can build your own Target Dieline. Once this is complete, the rest of the process is exactly the same as part one.
I wanna dieline. I wanna! I wanna!! Gimme!!!
You might want to insist the printer provide you a curved dieline for your mockup purposes. After all, there is one sitting around somewhere, right? Seems like perfect justification for a case of righteous indignation. Maybe not. It’s possible that the printer does not have one and cannot provide one. The reason for this is the Dry Offset Cup Press. In the video I’ve embedded below, keep your eye on the right side of the frame where you can see the ink-laden blanket imprinting the cups as they are spun on the mandrel. Notice the image on the blanket is rectangular, not curved.
It’s rather complicated, but the way this print process works is the smaller end of the cup drags across the rectangular blanket a little slower and the wider end spins across a little faster. The mandrel is mounted at an angle that keeps the whole face in contact through the full rotation. The effect is an on-press representation of the same horizontal distortions discussed in Part 1. This is a problem for us. Since the printer doesn’t need a curved image to engrave the plates, they likely don’t have a curved dieline to help you build your mockups.
Reverse Engineering the Cup
Without a supplied curved dieline, we need to create our own. Often the items you need to reverse engineer will be yogurt cups or sour cream tubs that print Dry Offest Lithography as discussed above. Let’s call these cups for consistency.
A (very) little Geometry
This section comes straight from Part 1, but it’s good background so I’ve included it here as well.
Take a moment to understand the geometry of the structure you are fitting the artwork to. Imagine how the typical curved dieline rolls up to fit the structure. How was this dieline shape arrived at? Any cylindrical package with a different diameter at top and bottom ends with straight walls joining these ends is a segment of an imaginary cone. See below:
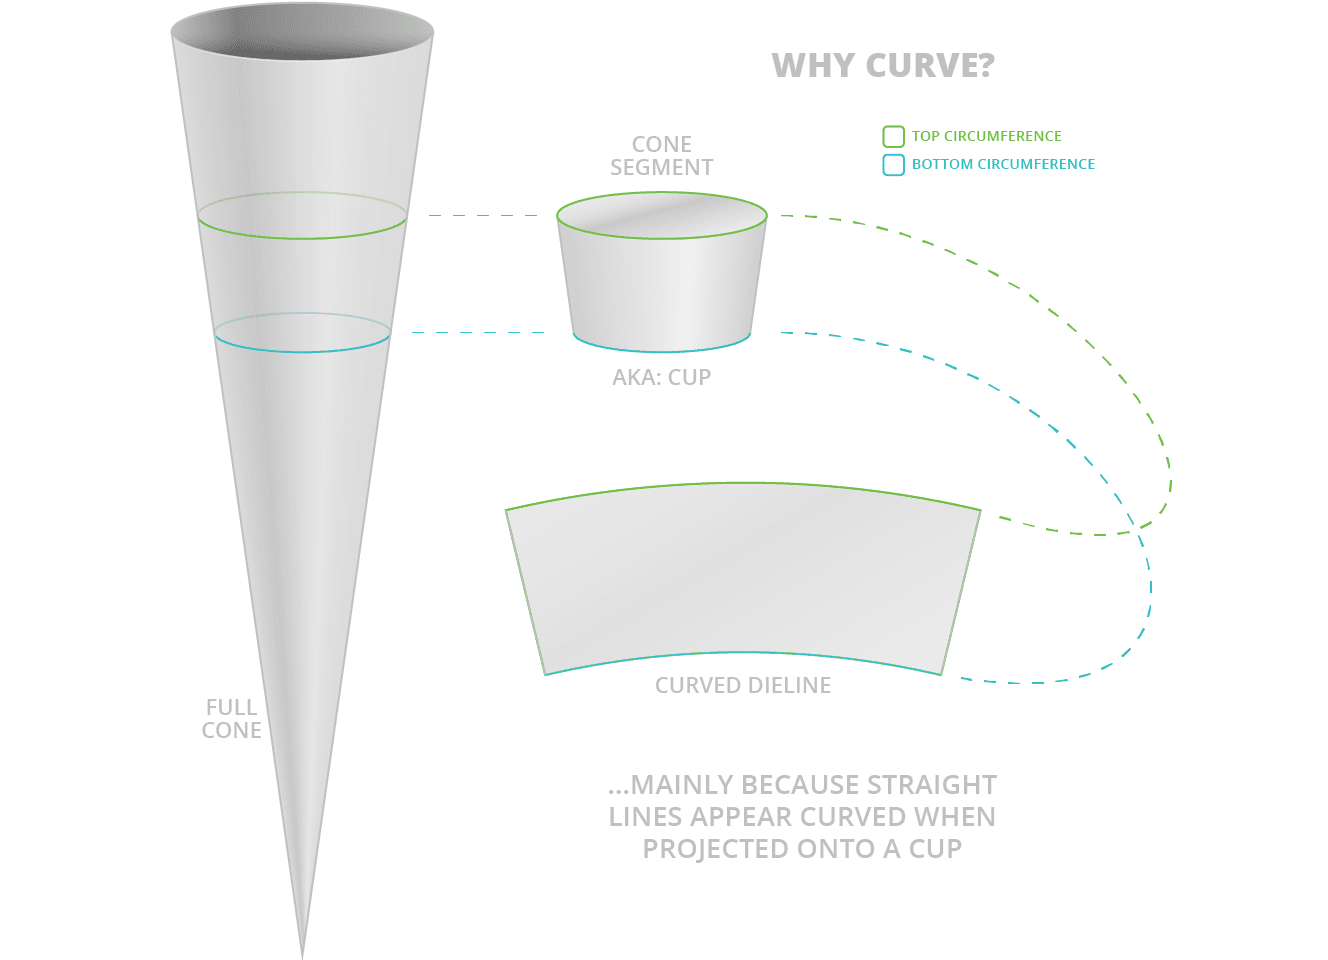
Differences in the proportion of the top & bottom circumference measurements interacting with the height measurement is why there is no one-size-fits-all solution to the curve problem.
Measure an actual cup
Your design is built on a rectangular shape. Where did that rectangular shape come from? If you didn’t read this blog post before concepting, it’s probably a rough guesstimate? Not sure or someone else picked the shape? There is an ideal rectangular source shape for every curved dieline. Let’s determine that ideal shape.
NOTE: There is no such thing as bleed in the dry offset cup printing process. The live area is always a bit smaller than the face of the cup. For other processes where you are unlikely to have a provided dieline, there are other problems, like shrink clings that are printed larger to allow shrinking to fit the form of the package, any dieline the printer could provide is likely little help for you and the paper mockup you’d like to make. I suggest disregarding bleed unless you know better, in which case you don’t need me to explain it to you 😉 You are likely making a dieline that will only be used for your own mockup purposes in any case.
Measure your cup in 3 areas:
- Height is easy. Make sure to keep your ruler completely vertical.
- Top Circumference This is where the string comes in handy. Wrap it around the highest printable point of the cup, making sure the string is parallel with the top of the cup all the way around. Mark the string with a pen so you can measure it flat on a ruler.
- Bottom Circumference Wrap the string around the lowest printable point of the cup, making sure the string is parallel with the bottom of the cup all the way around. Mark the string with a pen so you can measure it flat on a ruler.

Math Figgerin’s and Brain Thinkin’s
We want to make a curved label that can be wrapped around your cup to show the design on the actual package. Something like the dieline below:

A Google search yielded this reference PDF showing a cup rolled out to show how it’s sloped outer surface is projected onto a piece of flat paper. As you see, the shapes created by rolling out the cup are two concentric circles. How can we figure the sizes of those circles without actually rolling the cup and tracing the edges?
The easy way is to use this website. If you are a math whiz and would like to give me the actual formulas, please leave a comment. I’ll give you 10% off my hourly rate, should you decide to hire me for a project 😉 You get three numbers from this calculation: Arc Angle, Radius 1 & Radius 2. See below diagram to see the artwork you will create using these numbers:
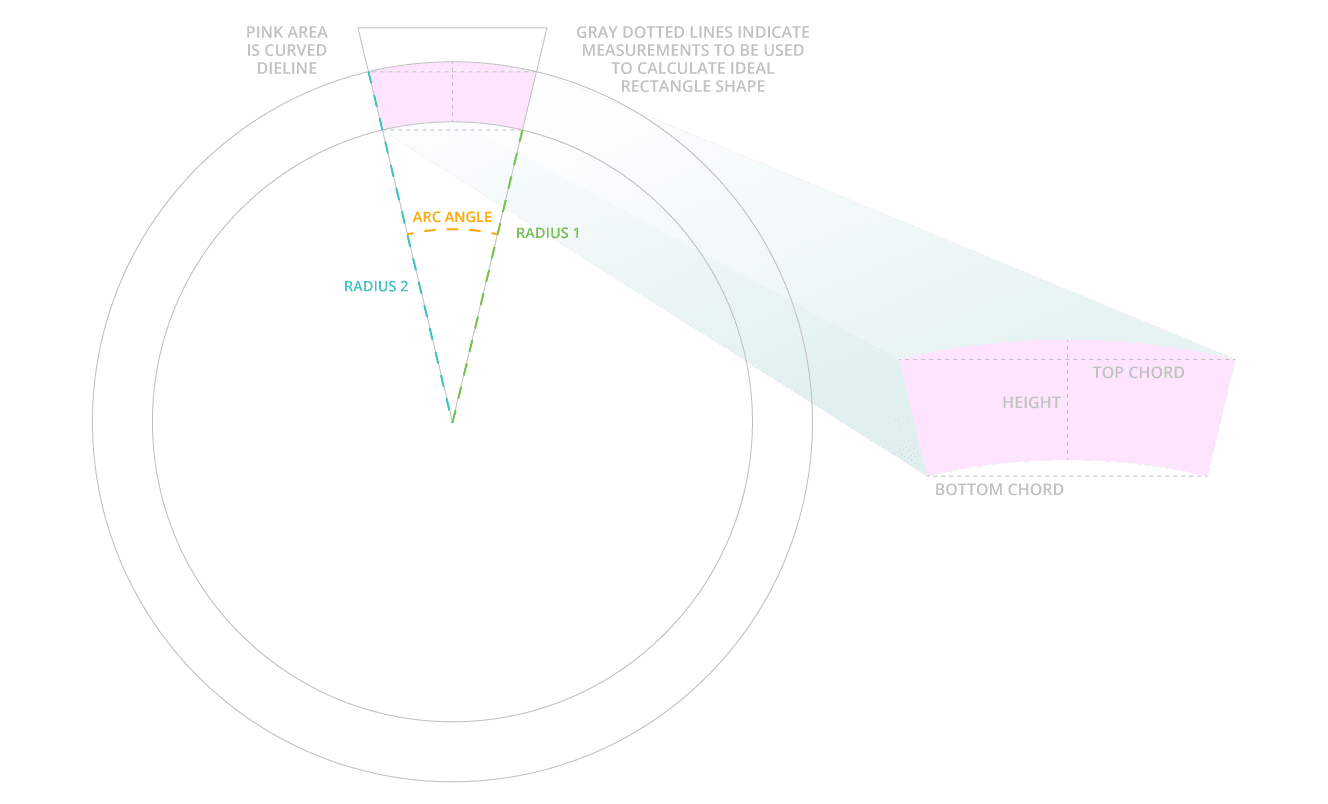
Start with the Concentric Circles using the Radius 1 & 2 dimensions then use the drawing & transform tools in Illustrator to create the triangle with the Arc Angle indicated. Be sure both circles are concentric (share the same center point) and the apex point of the arc is positioned on those center points. Where all 3 shapes intersect is your curved die line (in pink above). You can now take this shape back to Part 1 of this tutorial and proceed from there, or read on and see a very similar process, with a small variation as indicated from what was shown in Part 1.
What appears below is almost exactly the same as Part 1. The screen shots are different since I am using an alternate version of the design incorporating a small Raster image which can be left un-warped due to it’s non-critical alignment with lines & other artwork. This is to illustrate the difference between small raster artwork that can be safely ignored versus tightly integrated artwork that must be warped in registration with the vector artwork which is why I wrote Part 3 where I explain how to precisely warp Raster Art in Photoshop.

If you have your own reasons for not using Illustrator, you’ll have to find you own techniques to apply the concepts discussed below. I hope this translates conceptually so the ideas discussed can be applied to other workflows. If you do figure out another way, please comment on this post and share your ideas.
NOTE: You must be using Illustrator to follow the technical instructions. Be sure your artwork is designed in Illustrator using no linked graphics (we will discuss how to handle linked graphics in Part 2 of this tutorial). Illustrator is the industry standard for Packaging work, so that should go without saying, but if it needs saying, well…it’s been said.
Preparing to apply Illustrator Warp Tool
Illustrator’s Warp function has (at least) three idiosyncrasies:
- Warp doesn’t disregard artwork hidden behind a clipping mask. In other words, the warp envelope will extend out to the edge of the artwork hidden behind a clipping mask, this will destroy all the hard work you’ve done (and your curve). This is exactly opposite of how the regular Transform tool works in Illustrator, so this behavior was most unexpected the first time I discovered it. I’d call it a bug in the software. You will need to actually trim away excess clipped artwork. Use Command-Y (Outline view) to see all vectors in a wireframe view, this will help you spot the artwork that is clipped and not visible in the normal Preview view mode. Use Command-Y again to return to normal Preview view mode. Expand Appearances and use Pathfinder to trim away masked artwork. I won’t go into detail, just a quick example below to make the point clearly:
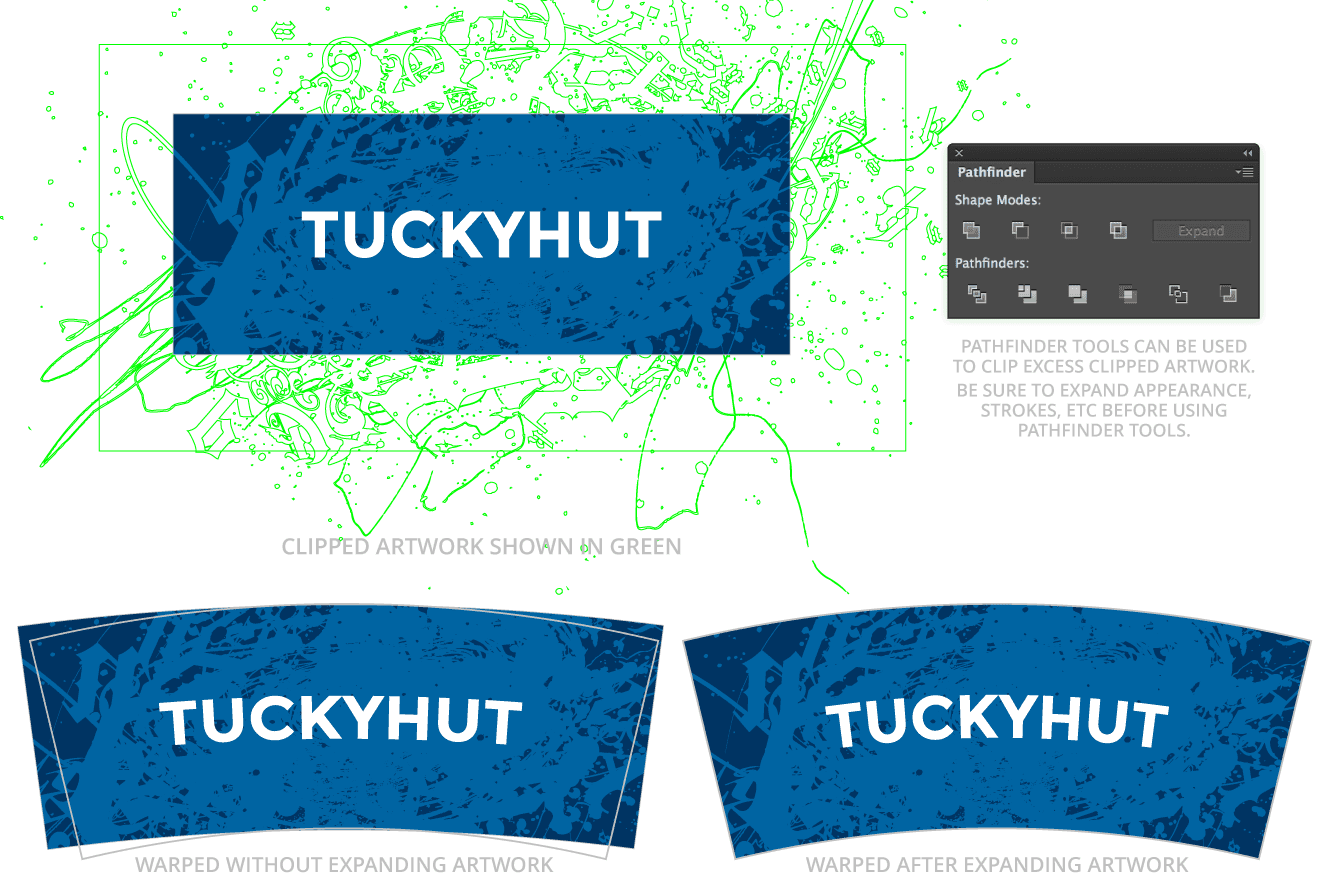
- Warp will not warp linked images. Linking images (especially raster) is best practice, thus you need to manage linked images separately. Photoshop has a Warp feature as well, I will post a follow-up article showing my workflow. One tidbit that might get you started: The Photoshop Warp tool uses exactly the same settings as the Illustrator Warp tool. Below I show how you might place an isolated raster image without warping for expediency:

- Complex Appearance effects, Live Type, Blends, Path Profiles, etc. can get glitchy when placed inside a Warp. Check your art carefully, especially areas that use tricky techniques. Expand and Expand Appearance can be your friends here (remember to save a pre-Expand/Expand-Appearance version of your artwork as you lose editability once your effects are Expanded). Also, check out the Envelope Options menu item which gives a few toggles that may help render certain types of artwork better. Expect to do some trial and error troubleshooting.
Final idiosyncrasy
There will be Horizontal distortion at the top and bottom of your artwork. On the smaller end (usually the bottom) artwork will be compressed. On the larger end artwork will be expanded horizontally. The diagram below is a representation of how this distortion is distributed across the curved artwork:

This distortion isn’t Illustrator-specific. It is inherent in the curving process no matter how the curve is applied. It can even be introduced on the printing press during the production run. Mitigating this distortion is the reason for step 2 in the Perform the Curve instruction below. Without step 2 (and without using the average of the two chord measurements to create your Ideal Rectangular Shape) the distortion would be distributed in one direction—no distortion at the bottom and extreme distortion as you move up the package.
Perform the curve!
- Final preparation—make sure the artwork is unlocked, on one layer and grouped into a single group.
- Horizontally Scale the Ideal Rectangular Shape and all the artwork to match the width of the Bottom Chord measurement you took earlier. This is to compensate for a distortion that is introduced in the next step (see diagram below for details). This will make all artwork narrower while leaving the vertical dimension untouched. This is by design.
- Place this scaled artwork over the Target Dieline. The bottom corners of the artwork should sit right on the bottom corners of the Target Dieline. If the corners don’t line up, something is wrong.
- Apply Envelope Distort > Make with Warp… and in the dialog box that appears select Style > Arc and use the Bend property to adjust the curve until you match the Target Dieline. Confirm by clicking Okay. The last three steps are diagramed below:
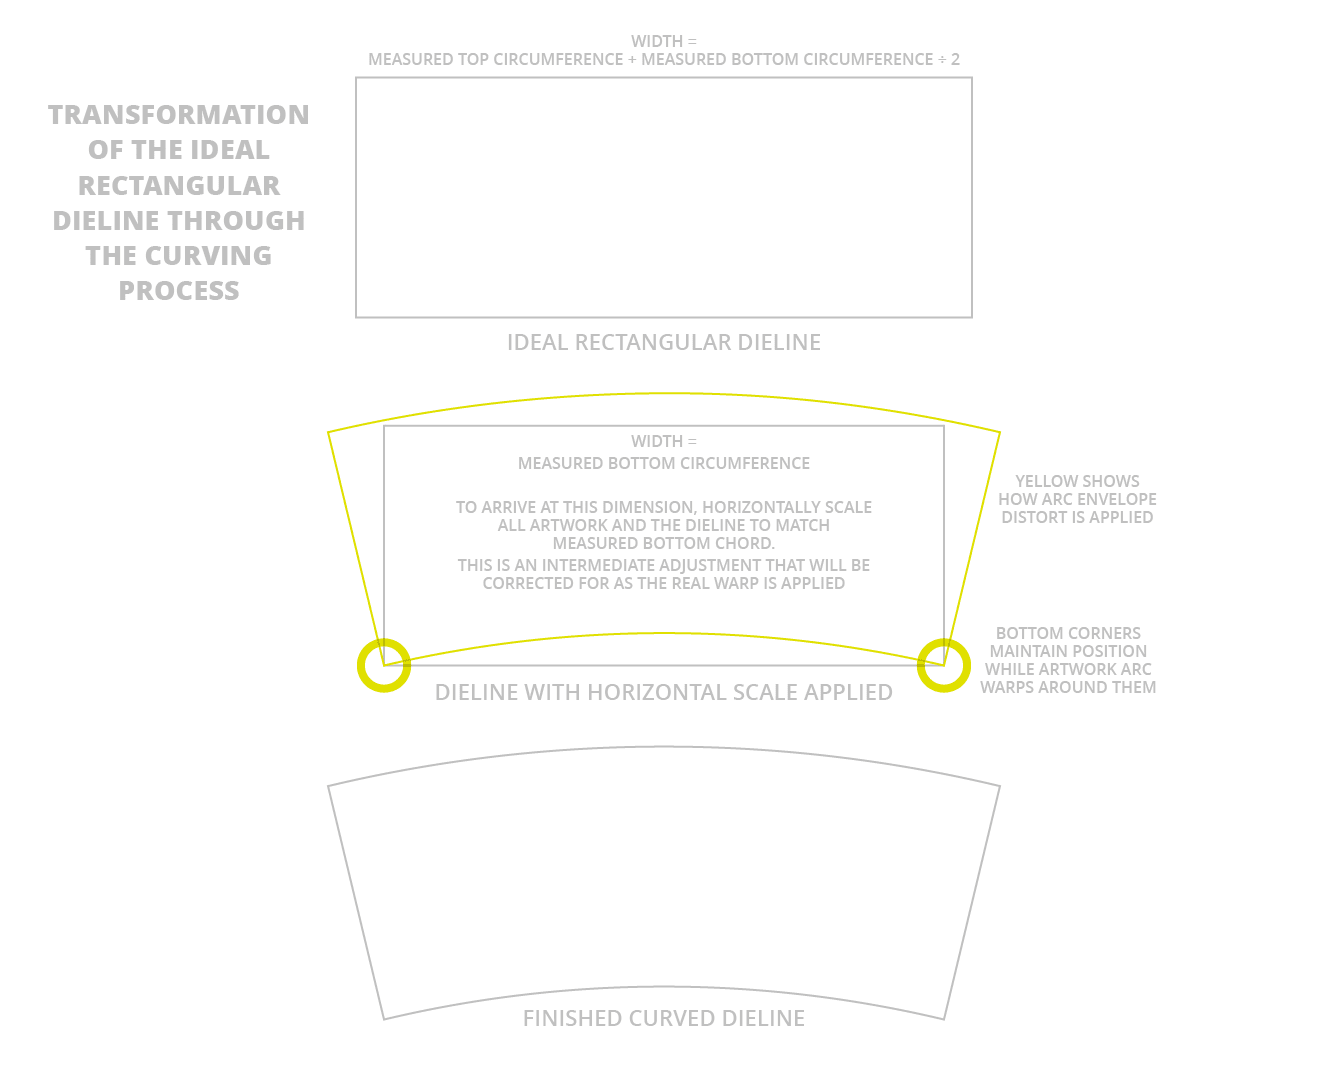
- Place the Target Dieline over your freshly curved artwork, this will put back any radiused corners and trim lines that may have ben ignored during the preparation for curving.
- Save this file. Again, I strongly suggest not overwriting your Ideal Rectangular Shape file. Depending on how much Expanding and Pathfindering was needed to get to this stage, this curved file will be much more difficult to edit.

Unless you have Raster graphics that need curving, you are done. Time to go pet your dog or hug someone!
Want to talk curved dielines in-depth? I love doing this kind of work and would be happy to collaborate.
This is brilliant! I’m a package designer who is used to having dielines supplied to me by whichever supplier is making the food, but I’m doing freelancing on the side and now I’m the one making dielines! I have an empty container sitting here, begging me to figure it out! My methods would have likely involved some paper and lots of printing & cutting out had I not stumbled upon this excellent post. Thank you!!!
Hey, Rachel. So glad you found this post useful. I had a helluva time finding detailed information on this topic via web searches, which is why I took the time to document as many of my own techniques as I could.
Good luck in the packaging world! Its a great way to stay busy. At least here in Minneapolis.
Robert – Thanks for doing this. Your article is the most complete resource we’ve found for managing this issue. I particularly like the detail on determining the size of ideal rectangle.
It’s still quite a complicated procedure and there are some finer points you might include, plus one detail that doesn’t work for me.
To determine ideal rectangle, we need two circumference measurements, but to use the Russell calculator, these numbers must be converted to diameter (by dividing circumference by pi, or 3.14159) and then Russell radius values must be doubled to get diameter measurements Illustrator needs to create the two circles. Also, when creating the dieline in Illustrator, we want the finished arc to be straight, on 0° axis. I think best way to achieve this is to start with a 90° rule and make 2 copies rotated in opposing directions — each at 1/2 the value of the Russell arc angle. Your diagram illustrates this, but it’s worth mentioning that the Russell numbers must be adapted for Illustrator tools. Graphic design geometry!
What doesn’t work for me is the note about horizontally scaling the ideal rectangle to match the bottom chord circumference. I find that if I follow that direction, my corners don’t quite meet and thus the warp/arc doesn’t quite fit. However, if I just manually scale (horizontally) to make the corners meet, the warp effect fits nicely and the art appears undistorted when applied to the tapered cylinder. I believe this difference is because we are making art for a pressure-sensitive label and we don’t want the ends to meet — there should be a gap of a 1/8-1/4”. So my chord measurements are short of the full circumference.
Hey Michael-
Awesome! It makes me happy to know people are finding this useful. I wrote these articles because I had the same frustrations as you when I googled this topic some time ago. Several years ago, back in my ‘working for the man’ days, I documented this process for the company I worked for. I called a former coworker to see if they still had the documents, but they had gone missing. So I re-did all the research and decided to put the results online this time.
The actual formulas are definitely the weakest point for me, so I think you may just be using a different method than I am to arrive at the same dimensions. Maybe it’s simpler, but honestly, I’m so dumb that I’d probably need you to draw me a picture to totally get it. I had to draw pictures of my method to totally understand it myself, then shade them nicely to share with the world 😉
You are right about the extra steps to make everything lay at 0°. There are several different ways you could do that, so I didn’t want to get too deep in the weeds on that task. But you are right to point out that it should be done!
Regarding your labels, I think you are right in guessing it’s the gap that is throwing off the final curve. You might try measuring the gap between the edges of the cup and the label when applied (assuming you have access to both items) and build a label template inside the Ideal Rectangular shape. Hopefully the inner template will match your label very closely, if very accurate measurements can be made. Otherwise, you will certainly get close enough for rock’n’roll with your method.
If I get some free time, I made consider adding a part 4 to this to deal with labels specifically. Originally I developed this for making mock ups of dry-offset cups where there where no curved die lines at all to use as templates for mockups. Labels have always been easier, for me, because usually a printer dieline is provided. But the technique is a little different, and it may be worth documenting separately.
Thanks for this—I had figured everything else out, but the angle and radius calculations in particular are invaluable!
Incidentially, you are now one of the top results on Google on this topic, so well done!
Perform The Curve INDEED!
Step 2, you are a genius. I tried the warp before this tutorial and it seemed off. I started looking at other solutions such as Esko Studio ($175 / month OMG) and was going to try Warp Studio 1.0 (very basic and seems like its guess work scaling vs your precision method, which is the only way to go).
Kudos Michael Carr on the point that the finished arc to be straight, on 0° axis and thank you for pointing out the manual scaling of the art to meet the corner, didn’t ty it yet just so exited I wanted to write a reply asap.
This image really helped me with the formulas,
What I did was I made a column in excel for the inputs and every other value as I read through them. They are well organized and the later values depend on the earlier ones. under each value I added an equation in excel and linked to the respective values. After seeing all of them I needed to add the large diameter and the small diameter and tied them in to the equation so as I changed the input the output will change. This method of doing it is very helpful because no matter how accurate you measure your cup there will be a decrepency somewhere in the print out so dimensions will need to be tweeked.
Thanks everyone for the comments. I’m glad this turned into a discussion. It’s one of those topics that comes up every now and then, but unless you work for a very specialized company, you probably don’t have the whole thing memorized. And there are lots of little tricks.
This afternoon I overheard the production manager at the design agency I’m working with on-site this month asking around for help curving some artwork for a last-minute client mockup request.
I was able to offer to take on this task confidently. Def won some points with her. Being smart is a great way to get repeat business.
Dear Sir,
I like this process and I same process follow but I am going to repeat on cylinder for printing but doesn’t match repeatlength of cylinder so, please advise
Regards,
Ravi
Thank you, I followed this, and created a perfect label that fits the tapered container I am working with, but the printing vendor ending up rejecting it saying they could not work with any files that used a “distortion filter”, each element need to be individually arched custom… kill me now…
Ravi-
So sorry for the delay in responding. I have had a very busy spring and early summer of client work. Just getting back to reviewing blog comments today.
You commented on Part 2 of my curved artwork series, a workflow designed for situations where you don’t have a dieline or plate layout from the printer to work from. Part 2 comes in handy for making mockups to fit packages where you don’t have specifications and all you can do is reverse engineer based on measurements. I would not recommend building production-ready artwork by reverse engineering the dieline using measurements taken from an example package, as outlined in Part 2.
If you have a specific layout to match, I would use whatever dieline/press layout you have been provided a try Part 1. If you don’t have enough information to follow Part 1, I’d get in touch with the printer to get more information.
I’ve been in the same boat, where I start a project reverse engineering a package dieline, telling the client this dieline & curve will need to be redone with the final dieline once available.
Sorry for the delay…I am just getting to blog comment moderation after months of heavy client work.
That is really too bad the printer rejected the artwork. Obviously they prefer to do a hack job themselves, which doesn’t require a recurving when edits must be made (and they always must be made!). I’m sure I’m preaching to the choir by pointing out there is no way to achieve correct geometry by individually arching elements.
The only mitigation strategy I can think of is to discuss the workflow via a Prepro meeting with the client and their printer to make sure everyone understands what the deliverable and artwork fidelity standards will be. Unfortunately many printers do not read the language they print natively and have an even simpler understanding of artwork, these are problems they must solve to operate productively. They often see designers as another problem they would love to eliminate, rather than how we see ourselves: as an agent of the client who should be acknowledged. They want to get ink on the package as expediently as possible and will try to veto design input unless you get backup from the client who ultimately pays the printing bill.
Hey there,
I just wanted to drop in and explain the concentric circle math to you: no consultation fee reduction necessary.
1. The “arc length” of a portion of a circle, s, is calculated as s=πrθ/180 where θ is your arc angle. You should think of s, here, as the measured circumference of your container.
2. The dude’s infographic is a bit misleading, seemingly asking you for the diameter of the conical section, and not the circumference, but the gist of what they’re doing is that they’re setting up a system of equations:
• s_bottom = π r_1 θ / 180
• s_top = π r_2 θ / 180 = π (r_1 + h) θ / 180
where h is the measured height of your container. You’ve got two equations, and two unknowns. Now, assuming s_bottom < s_top, we can use algebra to arrive at the following:
• r_1 = h s_bottom / (s_top – s_bottom)
• θ = [180 (s_top – s_bottom)] / (π h)
(and obviously, r_2 = r_1 + h).
I'm not sure if any of this helps you, but I figured exposing the math can't hurt.
-Steven
Thanks for getting the math right on this. I’m in deep with client work right now, but when I get a chance I’ll update this post with this information. The math portion always has bugged me since I don’t know enough to write it out properly.
Thanks again!
Thanks! You’ve saved me a LOT of time. Eight years ago all I could do was eye-guess (which fortunately turned out pretty close to the accurate measure) but now I can rely on accurate measures.
Hey Robert! First of all, thank you for the amazing article.
When placing some text in this kind of artwork, do you warp them as well?
Or do you put it using the “Type on a Path tool”? (in that case, considering there will be a plenty of paths geometrically aligned to the top and bottom arc – probably done using the blend tool).
Thank you in advance.
Sorry for the delay Luiz. I would warp text along with everything else. Though I would probably outline it before I apply the warp. Make sure to save a version of the artwork before you outline the type!